

How to Add Bleed in Photoshop
Posted by Clash Printing Atlanta on 30th May 2025
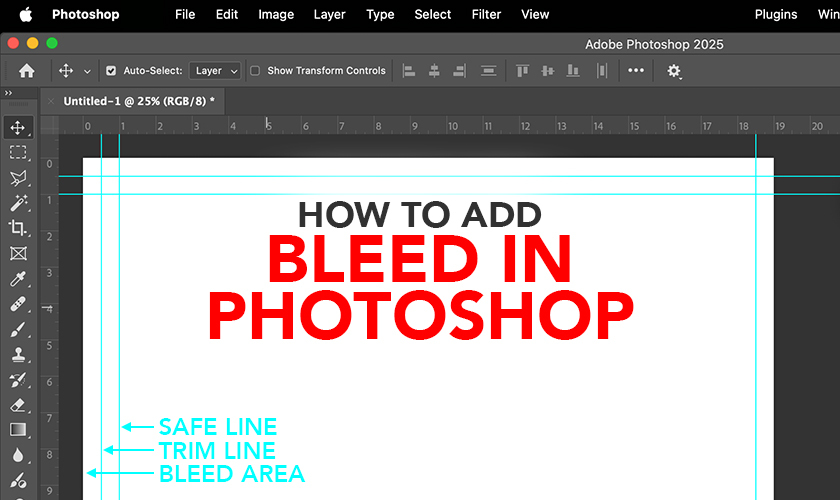
When designing print ready files in Photoshop, you will need the image and/or graphic to extend beyond the trim line to the furthest edge of the printed material to prevent white space or your text getting cropped once the printed material is cut/trimmed to its final size. This concept is referred to as print bleed, and setting your Photoshop file up properly is critical to achieving this goal.
Common Bleed for Print Files
Determining your bleed amount depends on the final size of your print material. For most common size marketing materials and printed documents, a standard print bleed margin is .125 inches on all sides.
As an example, for a Letter size document, you will be adding .125 inches to the top, right, bottom, and left side of the graphic/document. The final Letter artwork will be cut to the 8.5 x 11 inches, but the final print-ready file needs to be sized at 8.75 x 11.25 inches to allow for margin and trimming.
For documents larger than 24 x 36 inches, the standard bleed margin is .5 inches on all sides (top, right, bottom, and left) of the document. So when preparing an 18 x 24 inch document, you need the print-ready file template to be 19 x 25 inches to satisfy the necessary bleed requirement.
How to Add Bleed in Photoshop
How to add bleed in Photoshop to an existing print file smaller than 18 x 24 inches:
- Open your file (graphic/document)
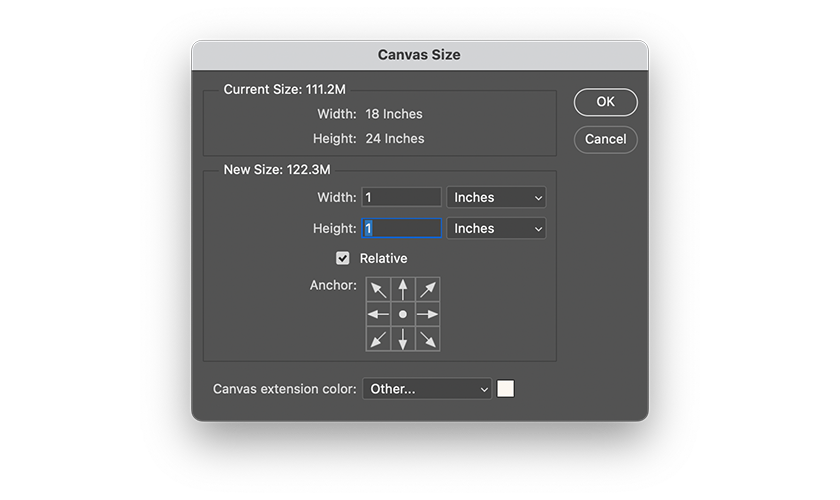
- Click on ‘Image > Canvas Size’
- Check the box next to ‘Relative’
- Input “.25” for “Width”
- Select “Inches” from the dropdown next to “Width”
- Input “.25” for “Height”
- Select “Inches” from the dropdown next to “Height”

How to add bleed in Photoshop to an existing print file 18 x 24 inches or larger:
- Open your file (graphic/document)
- Click on ‘Image > Canvas Size’
- Check the box next to ‘Relative’
- Input “1” for “Width”
- Select “Inches” from the dropdown next to “Width”
- Input “1” for “Height”
- Select “Inches” from the dropdown next to “Height”
Creating a New Document with Bleed in Photoshop
Here’s how to create the template for a new print-ready file for several of the most common print materials in Photoshop (including the proper bleed):
Small Poster (18 x 24 inches)
- Click ‘File > New’
- Input “19” for “Width”
- Input “25” for “Height”
- Select “inches” in the dropdown
- Input “300” for “Resolution”
Letter Document (8.5 x 11 inches)
- Click ‘File > New’
- Input “8.75” for “Width”
- Input “11.25” for “Height”
- Select “inches” in the dropdown
- Input “300” for “Resolution”
Legal Document (8.5 x 14 inches)
- Click ‘File > New’
- Input “8.75” for “Width”
- Input “14.25” for “Height”
- Select “inches” in the dropdown
- Input “300” for “Resolution”
Postcard/Flyer (4 x 6 inches)
- Click ‘File > New’
- Input “4.25” for “Width”
- Input “6.25” for “Height”
- Select “inches” in the dropdown
- Input “300” for “Resolution”
Postcard/Flyer (5 x 7 inches)
- Click ‘File > New’
- Input “4.25” for “Width”
- Input “6.25” for “Height”
- Select “inches” in the dropdown
- Input “300” for “Resolution”
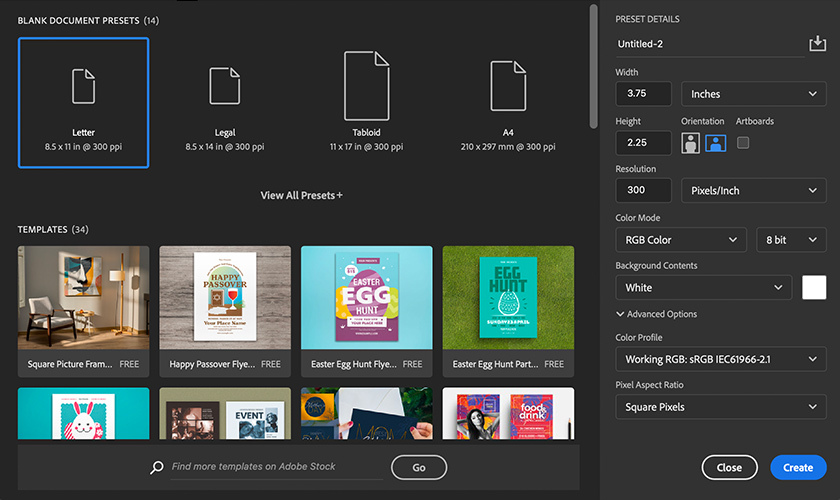
Business Card (3.5 x 2 inches)
- Click ‘File > New’
- Input “3.75” for “Width”
- Input “2.25” for “Height”
- Select “inches” in the dropdown
- Input “300” for “Resolution”
Once you have your print ready file properly sized, setting guides will be helpful to visualize where cutting may occur, to ensure proper spacing and that no important elements on your artwork get trimmed or cut off.
How to Add a Guide in Photoshop
After the bleed margin is added to your graphic, using guides will help you visualize the safe zones and areas of the file that may be trimmed by the printing company. The steps below will help you add guides to your artwork.
Example: Business Card (3.5 x 2 inches)
- Press ‘Ctrl+R’ to enable rulers in Photoshop
- Click on ‘View > Guides > New Guide’
- Check “Vertical” button
- Input “.125” for “Position”
- Check “Vertical” button
- Input “3.625” for “Position”
- Check “Horizontal” button
- Input “.125” for “Position”
- Check “Horizontal” button
- Input “2.125” for “Position”

Adding the Second Guide in Photoshop
For print materials smaller than 18 x 24 inches - the position of the first ‘Vertical’ and ‘Horizontal’ guide will be “.125 inches”; whereas the second ‘Horizontal’ and ‘Vertical’ guide will be the full size of the document (Width and Height - including the bleed area), minus .125 inches.
Example: for a 5 x 7 inch postcard (5.25 x 7.25 inches - including bleed), the second ‘Horizontal’ guide position will be 5.25 - .125 = “5.125” inches, and the second ‘Vertical’ guide position will be 7.25 - .125 = “7.125” inches.
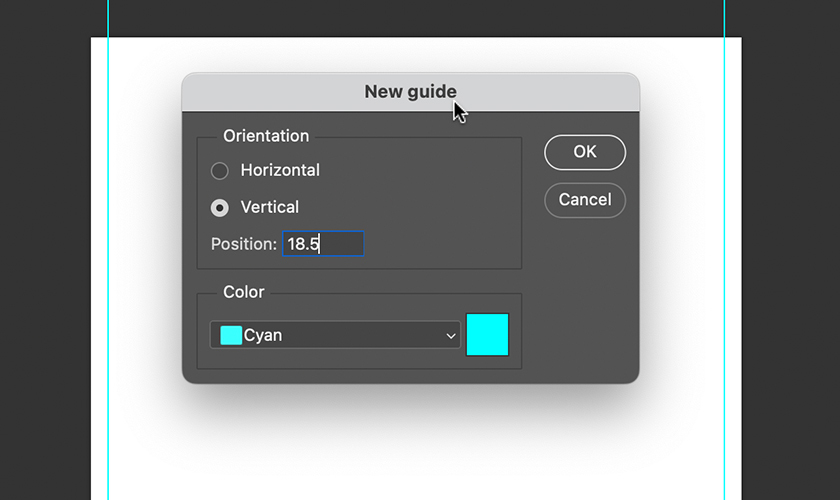
For print materials 18 x 24 inches or larger - the position of the first ‘Vertical’ and ‘Horizontal’ guide will be “.5 inches”; whereas the second ‘Horizontal’ and ‘Vertical’ guide will be the size of the document (Width and Height - including the bleed area), minus .5 inches.
Example: for a 18 x 24 inch poster (19 x 25 inches - including bleed), the second ‘Horizontal’ guide position will be 19 - .5 = “18.5” inches, and the second ‘Vertical’ guide position will be 25 - .5 = “24.5” inches.
Critical Distinction About Adding Bleed
An important consideration and distinction is adding bleed to an existing document is different than creating your artwork on a design template file that had already incorporated a margin for bleed. When adding bleed to an existing Photoshop file, a white space of .125 or .5 inches will be added around the entire artwork. Once this whitespace is added, your artowork and elements of your graphic will need to be extended to cover this bleed margin / white space area.
Whereas if you designed the artwork on a template that already incorporated the bleed, there will be no need to create an additional margin area and the artwork can already be designed with this margin in mind.
This matters because all elements, including your background images and text may have to be resized to stretch to the edge, moved, or edited once you add the White space margin to your print ready file.
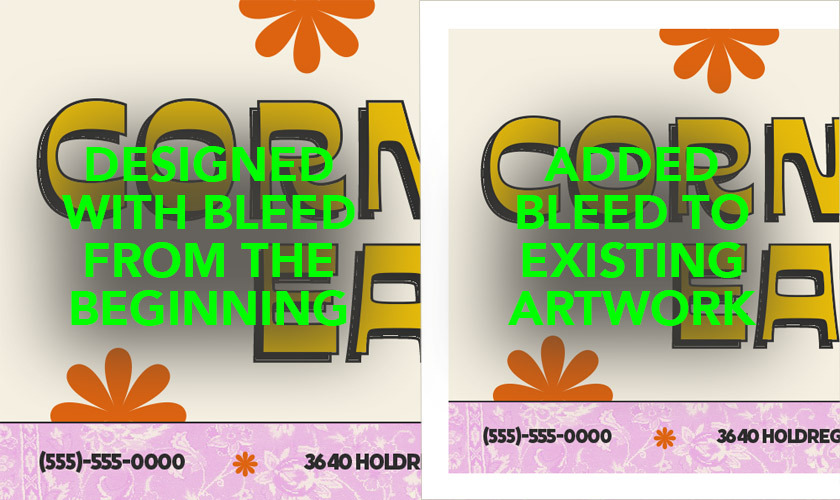
However, preemptively incorporating bleed from the start, and designing your artwork with that in mind, eliminates the need for modifications before sending the final print-ready file to your printing company.
Concluding Adding Bleed to Your Print File
Using bleed in graphic design is required by printers and critical to achieving the desired outlook for your printed marketing materials. Understanding its purpose and the best way to incorporate it in Photoshop files is an important component of your graphic design workflow. Adding bleed to an existing document is different than creating a new artwork that incorporates bleed from the beginning. However, once bleed is created, using guides and Photoshop will help you manage the bleed area, trim line, and safe margins for your text and graphics. Now that you understand how to create an ad bleed, your printed materials will turn out as you envisioned and intended.